Team MovementAfter each team plays a few hands against the same opponents, at least one of the teams must move to a new table to play against another team. Usually the cards also move to another table so they can be played by two new teams. To tell the teams where to go next (and where the boards should as well), this information is placed on a sheet in the center of the table. The precise manner in which each team moves depends on the number of teams involved and is called a movement. There are multiple movements available for any particular number of players. Some of the movements I use can be found below.
Team competition
2 tables – team
3 tables – team
4 tables – team
Singles competition
2 tables – singles
With only 8 players you may prefer to play a singles completion. In this format each player plays with a new partner at each movement. Scores are totaled individually for each player instead of for each team. However, each board must be replicated. For instance there must be 2 copies of board 1 that contain the exact same hands. This requires that someone (usually the director) must have set this up in advance. Since that person has already seen the hands, they should not participate in the game.
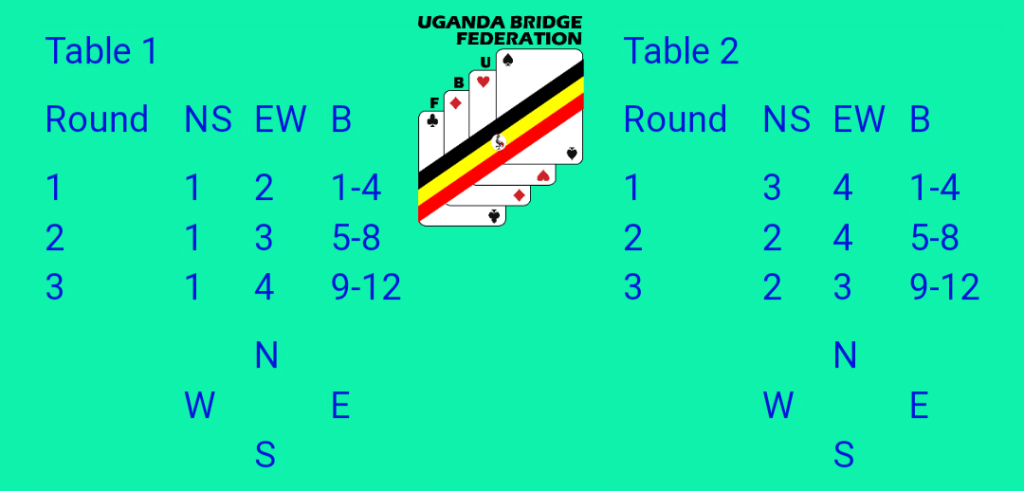
Let’s take a close look at some of these table sheets to make sure we understand how to use them. We’ll first look at the sheets for the 2 table team movement.
| Table 1 |
|
| Round |
NS |
EW |
B |
|
| 1 |
1 |
2 |
1-4 |
| 2 |
1 |
3 |
5-8 |
| 3 |
1 |
4 |
9-12 |
|
|
N |
|
|
W |
|
E |
|
S |
|
|
| Table 2 |
|
| Round |
NS |
EW |
B |
|
| 1 |
3 |
4 |
1-4 |
| 2 |
2 |
4 |
5-8 |
| 3 |
2 |
3 |
9-12 |
|
|
N |
|
|
W |
|
E |
|
S |
|
|
In this movement the 4 teams will play 3 rounds of 4 hands each for a total of 12 hands. This is a reasonable number of hands for a typical session as this will usually take somewhere between 2 to 3 hours depending upon the amount of discussion of the new grandchild or your cousin’s wedding.
Notice that the teams are identified by numbers. The easiest way to accomplish this is to have your duplicate playing guests sit at the 2 tables opposite their partners and fill out sign in sheets which will assign each team a number and allow you to associate team numbers with the actual players when you have completed the scoring. These sheets should be on the tables when your players arrive so the team that sits in the N-S chairs (as defined by the compass points at the bottom of each sheet) at table 1 will know to sign in as team 1 and the E-W team will know that they are team 2. Similarly 3 and 4 will sign in as the N-S and E-W teams respectively at table 2.
Next note that the same boards (numbers indicated in the B column) are to be played during each round at the two tables. The way to handle this is to have one table play boards 1 and 2 while the other is playing 3 and 4. The boards can then be swapped when needed to complete the round.
When both tables have completed the play of boards 1-4, round 1 is completed. In this movement, team 1 will remain at table 1 while team 2 must move to table 2 since team 3 will be playing against team 1 at table 1. Similarly teams 2 and 4 will be playing each other at table 2. Round 2 is now played in the same fashion as round 1 but using boards 5-8. Since each team plays against all of the other teams, you will end of with one winning team, a second place team, etc. In the movements with more tables, each team will always sit in the same direction (N-S or E-W). Thus you will end up with a N-S winner as well as an E-W winner. The two table team movement is the most commonly used in the home environment as it can be difficult to find either the players or space for three tables of bridge.
Next we’ll look at two of the table sheets from the 3 table movement.
| Table 1 |
|
Next |
Table |
| Round |
NS |
EW |
B |
EW |
B |
|
| 1 |
1 |
4 |
1-4 |
2 |
3 |
| 2 |
1 |
6 |
5-8 |
2 |
3 |
| 3 |
1 |
5 |
9-12 |
|
|
|
N |
|
|
|
W |
|
E |
|
|
S |
|
|
|
| Table 2 |
|
Next |
Table |
| Round |
NS |
EW |
B |
EW |
B |
|
| 1 |
2 |
5 |
5-8 |
3 |
1 |
| 2 |
2 |
4 |
9-12 |
3 |
1 |
| 3 |
2 |
6 |
1-4 |
|
|
|
N |
|
|
|
W |
|
E |
|
|
S |
|
|
|
Note that these sheets contain 2 additional columns that tell the players which table to move to after each round and where the boards are to go after each round. Just to make sure that we understand this, look at the last two columns of the first round for table 2. These columns indicate that, upon completion of the first round, the EW pair is to move to table 3 and that the boards (5-8) are to move to table 1.
You might find it worthwhile to print the movements and get them laminated so they will have more body and last longer.